Introduction
Bucketverb is an analog reverb based on a long out-of-production bucket-brigade delay (BBD) chip with six, specially-spaced output taps. It can create a dark and rich ambience, as well as various strange warped effects. Because of the way it pans its various delay taps across the stereo field, it is particularly useful for taking a mono source and giving it some left-right spread.

Installation
Run the Installer
On Windows systems, you can choose to install the AAX or VST3 versions. The install locations are as follows:
| Format | Location |
|---|---|
| AAX | C:\Program Files\Common Files\Avid\Audio\Plug-Ins |
| VST3 | C:\Program Files\Common Files\VST3 |
On Mac systems, you can choose to install the AAX, VST3, or Audio Unit versions. The install locations are as follows:
| Format | Location |
|---|---|
| AAX | /Library/Application Support/Avid/Audio/Plug-Ins |
| VST3 | /Library/Audio/Plug-Ins/VST3 |
| Audio Unit | /Library/Audio/Plug-Ins/Components |
Authorize Your Copy
Please see the Utility Bar section for an explanation of how to authorize your copy.
Controls - Time Section
For any of the sliders, you may Command-drag (Mac) / Ctrl-drag (Win) to access fine resolution control.
Decay
Controls the level of signal recirculated through the delay circuit (aka feedback or regeneration). Allows for a Short or Long tail to the reverb sound.
Size
This slider controls the time between the delay taps, to emulate smaller or larger sized spaces. To create the longest delay times, this adjusts the simulated BBD chip down to a sampling rate as low as 10k Hz. For this reason, the input signal is lowpass filtered above 4 kHz, to minimize aliasing.
LFO Waveform
This switch activates an LFO to modulate the reverb Size. Besides the Off position, it offers Triangle and Random settings. In Random mode, the LFO is constantly in motion, sometimes moving quickly to a new value, sometimes slowly.
LFO Rate
This knob sets the speed of the LFO, from 0.1 Hz - 10 Hz.
LFO Depth
The amount of Size modulation is set with this knob. A range of 0% - 50% is available.
Controls - Stereo Section
Width
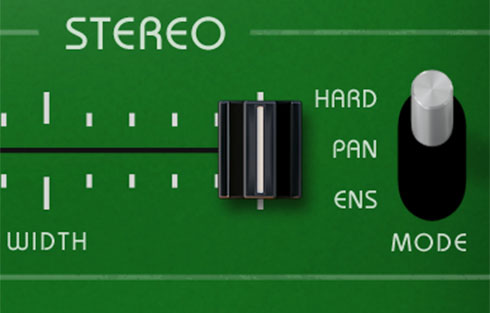
Controls the panning of the delay taps. At minimum, all taps are panned to center, creating a mono reverb effect. At maximum, alternating taps are hard panned left and right, creating the widest stereo spread.
Note: The stereo width of the dry signal is unaffected by the Width control.
Stereo Mode
The Stereo Mode switch offers three different modes:
Hardpan - Alternating delay taps are hardpanned left and right. The first reverb reflection always gets hard-panned to the left side, which psychoacoustically causes the ear to localize the reverb sound as being skewed towards the left. (This is most audible when the Width and Mix controls are both turned up to maximum).
Panimation - Alternating delay taps are slowly modulated across the stereo field. It's similar to auto-panning, but their stereo locations are staggered and blended to minimize the localization of the reverb sound.
Ensemble - And now for something completely different... This mode uses a pair of BBD chips, rather than a single one. Their delay times are modulated in a style inspired by what a Roland Dimension D does: a slow LFO is applied, and when one BBD is gently rising in delay time, the other is falling. It has a subjectively "thicker" and "softer" sound than the other two modes. (Note that the LFO used by the Ensemble mode is pre-set to a very low frequency, and is not affected by Bucketverb's main LFO controls.)
Controls - Other
HPF
This applies a high-pass filter (HPF) to the recirculated delay signals only. Helpful to avoid low frequency buildup, especially with longer reverb times and the Long Decay setting. The dry signal is unaffected by the HPF control.
Mix
Controls the blend of dry input signal and reverb. The dry signal is passed through the plug-in unaffected. At minimum the output signal is 100% dry, and at maximum the output signal is 100% reverb.
Controls - Tweak Bar
Below the main plugin GUI is a strip of mini knobs and buttons called the Tweak Bar, added in Bucketverb version 1.2. These will allow you to further modify parameters and get more "under the hood" of the processing.
Short Decay & Long Decay
These set the amounts of feedback for the two positions of the Decay switch. Each one is limited to half of the entire decay range – so the Short feedback ranges between 0%–50%, while the Long feedback ranges between 50%–100%. Previously, the preset levels for Short and Long Decay were 30% and 55%, respectively. So now you can get much longer decays than before, and experiment with heavy feedback oscillation.
HPF Frequency
This knob sets the cutoff for the high-pass filter (which, again, is applied to the feedback loop only). Previously, the HPF was preset for 160 Hz, but now you can tweak that from 20–500 Hz. Lower settings leave in more low end bloom, while higher settings clean low mids out of the reverb sound.
AA (Anti-Alias) Filter
This multi-position switch allows you to defeat the anti-alias filter that comes before the bucket-brigade (BBD) stage. As mentioned elsewhere here, normally Bucketverb lowpass filters the input signal above 4 kHz, to prevent aliasing at slower BBD clock speeds. However, with this switch you can choose between the default "Steep" setting (24 dB/oct lowpass), a "Shallow" setting (12 dB/oct), and "Off" (no anti-alias filtering).
Hint: to hear maximum aliasing artifacts, turn the AA Filter to "Off", set the Size slider to its maximum setting, and feed Bucketverb some audio with lots of high frequency content. Mmmm, crunchy!
Limiter
With the Long Decay setting now allowing for up to 100% feedback, Bucketverb can build up quite a bit of level in its feedback path. This limiter is applied to the wet output of the delay circuit, before it is mixed back with the dry signal by the Mix slider, in order to keep the output of the plugin under control. Its sonic effects are quite audible at high signal levels, however, so you have to option to turn the limiter off and deal with the level management downstream if you prefer.
Noise
This switches off the noise simulation in our virtual BBD circuit. Noise can be your friend, and its presence allows Bucketverb to go into self-oscillation with no external signal input. However, if you are running lots of gain/compression/limiting downstream from Bucketverb, and the noise floor is reaching an undesirable level, now you can defeat its internal noise source.
Utility Bar
Along the bottom of the plug-in window you will find the Utility Bar. This is where license management tools and other helpful (but non-audio related) functions reside.
License Management
Depending on whether or not Bucketverb has been authorized, the license management area in the bottom left of the Utility Bar will have different displays.
In Demo Mode
The display will read Demo Unlock, and mousing over it will change it to a Load License File button. In demo mode:
- Bucketverb’s settings will not be saved when you close a project file.
- The DAW’s preset menu will only save or load the default settings.
- Bucketverb's own Export and Load buttons are disabled.
- Every 30 seconds, audio will drop out and a burst of noise will be heard.
To authorize Bucketverb
- Log in to your reFuse Software user account, and use the "Download License File" button to save the license file to your desktop.
- Use the “Load License File” button to select the "Bucketverb_license_file.xml" from your desktop.
- A success message will appear, and offer to move the license file from the Desktop to the Trash. The authorization has been saved at this point, and it is safe to trash the downloaded license file.
In Authorized Mode
The bottom left of the Utility Bar will display your registered username. Mousing over it will change it to a Clear Authorization button. If you click this, a confirmation window will appear, asking if you want to clear the authorization for Bucketverb off the system.
Preset Menu
This menu loads from a set of Factory Presets designed to give an overview of Bucketverb's range of reverb sounds. Musician and mastering engineer Nathan Moody contributed several presets as well, which highlight some of the more extreme modulation effects achievable with Bucketverb.
When a preset has just been loaded, its name will be highlighted in yellow in the Preset Menu's display. Once any of the controls have been changed from the preset's settings, however, the name will no longer be highlighted.
Note that this menu does not load or display any user-saved presets.
Export & Load
The Export and Load buttons allow saving presets as files to disk. The format is a human-readable XML file, making it completely cross-platform. This allows interchange of presets between any DAWs or systems.
View Docs
This button opens the Bucketverb User Guide in your default web browser.
Check for Updates
This button will check with our server to see if you have the most recent update of Bucketverb. (It does not launch a web browser to do this, the check is done right in the plug-in.)
Keyboard Shortcuts
A number of keyboard shortcuts are available, when Bucketverb is the frontmost window:
- Standard copy paste shortcuts (
Command-C,Command-V) will copy/paste the current preset as XML data. A(no modifier key) opens the "Load License File" dialog as a native window, for improving accessibility by allowing interaction with screen reader software.I(no modifier key) copies diagnostic info to clipboard, for pasting into support requests.
Specifications
Virtual BBD clock frequency: 10 kHz - 100 kHz
LFO frequency range: 0.1 Hz - 10 Hz
HPF cutoff frequency: 20–500 Hz, defaults to 160 Hz (12 dB/oct, non-resonant)
Credits
Bucketverb is ©2020 reFuse Software, LLC
VST is a registered trademark of Steinberg Media Technologies GmbH


